
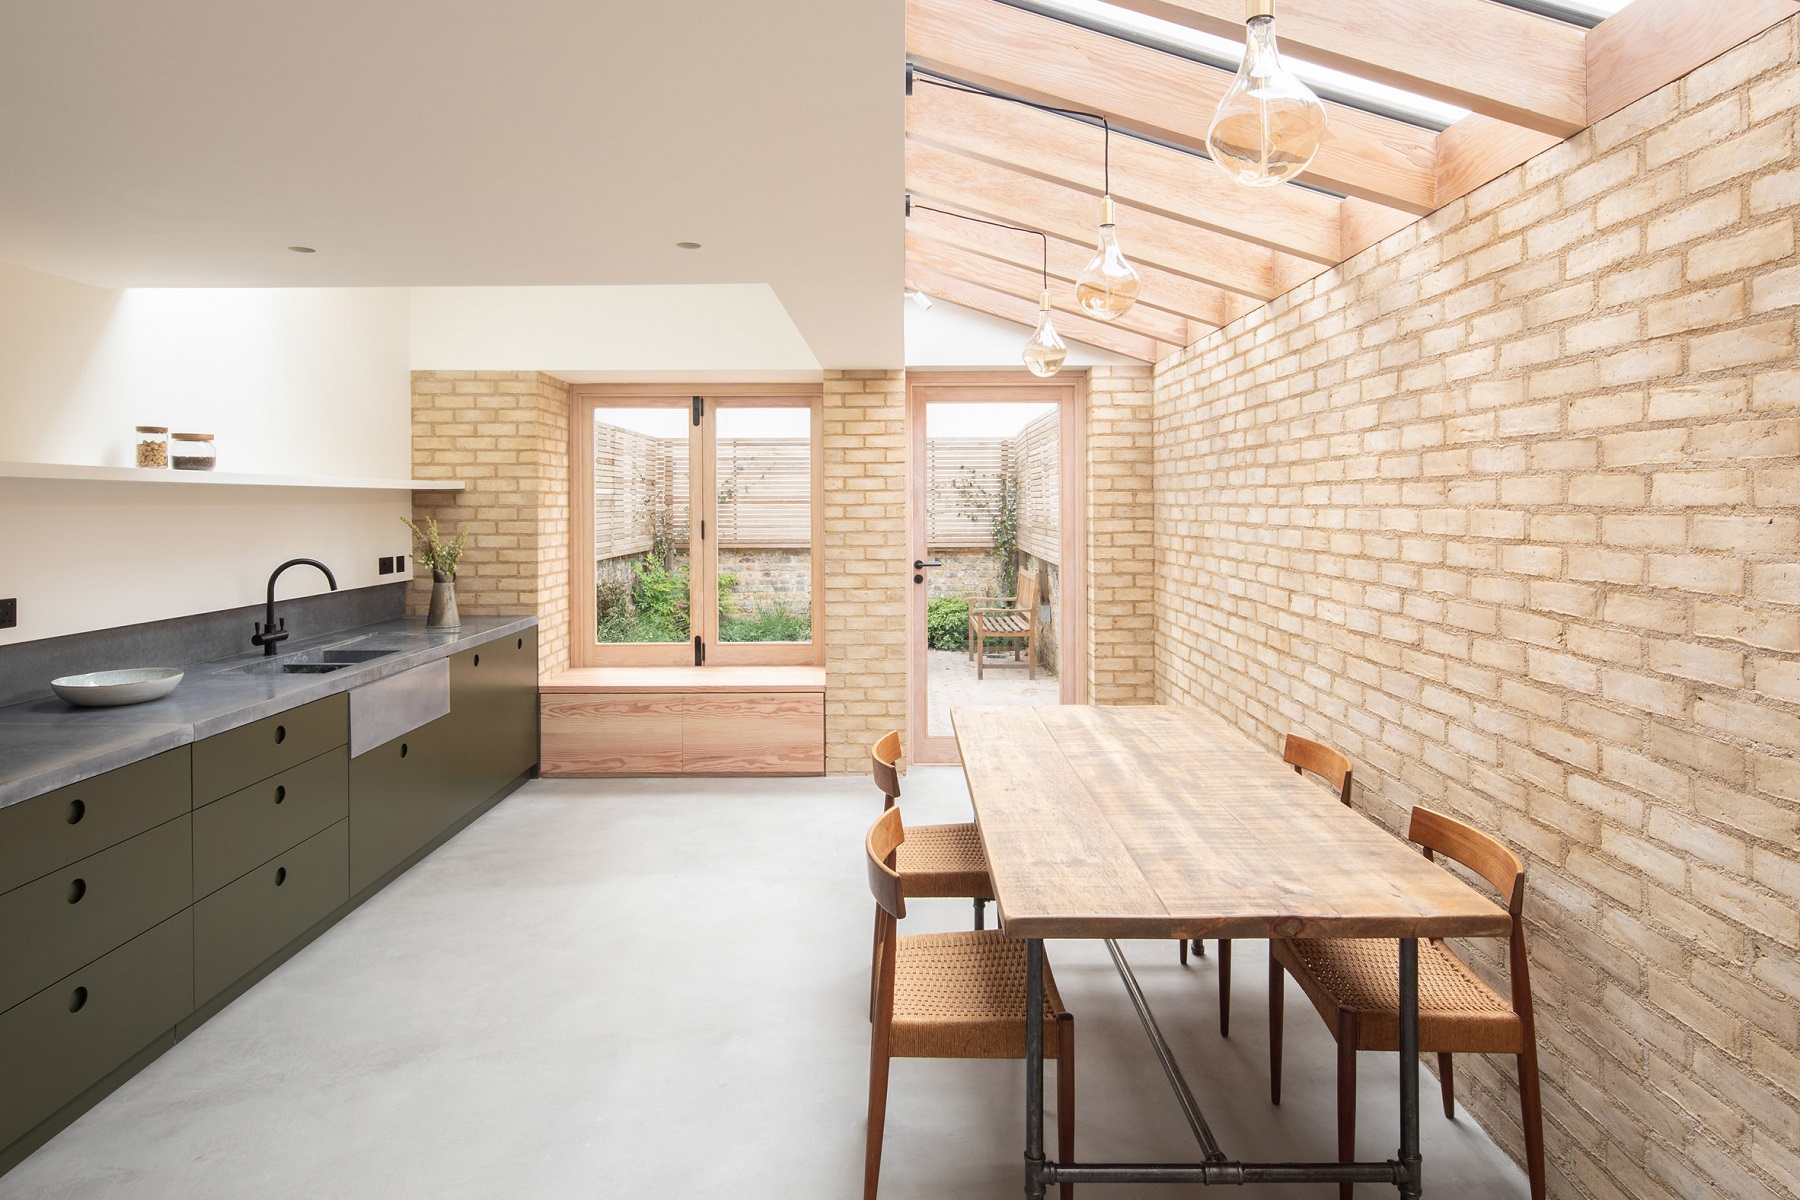
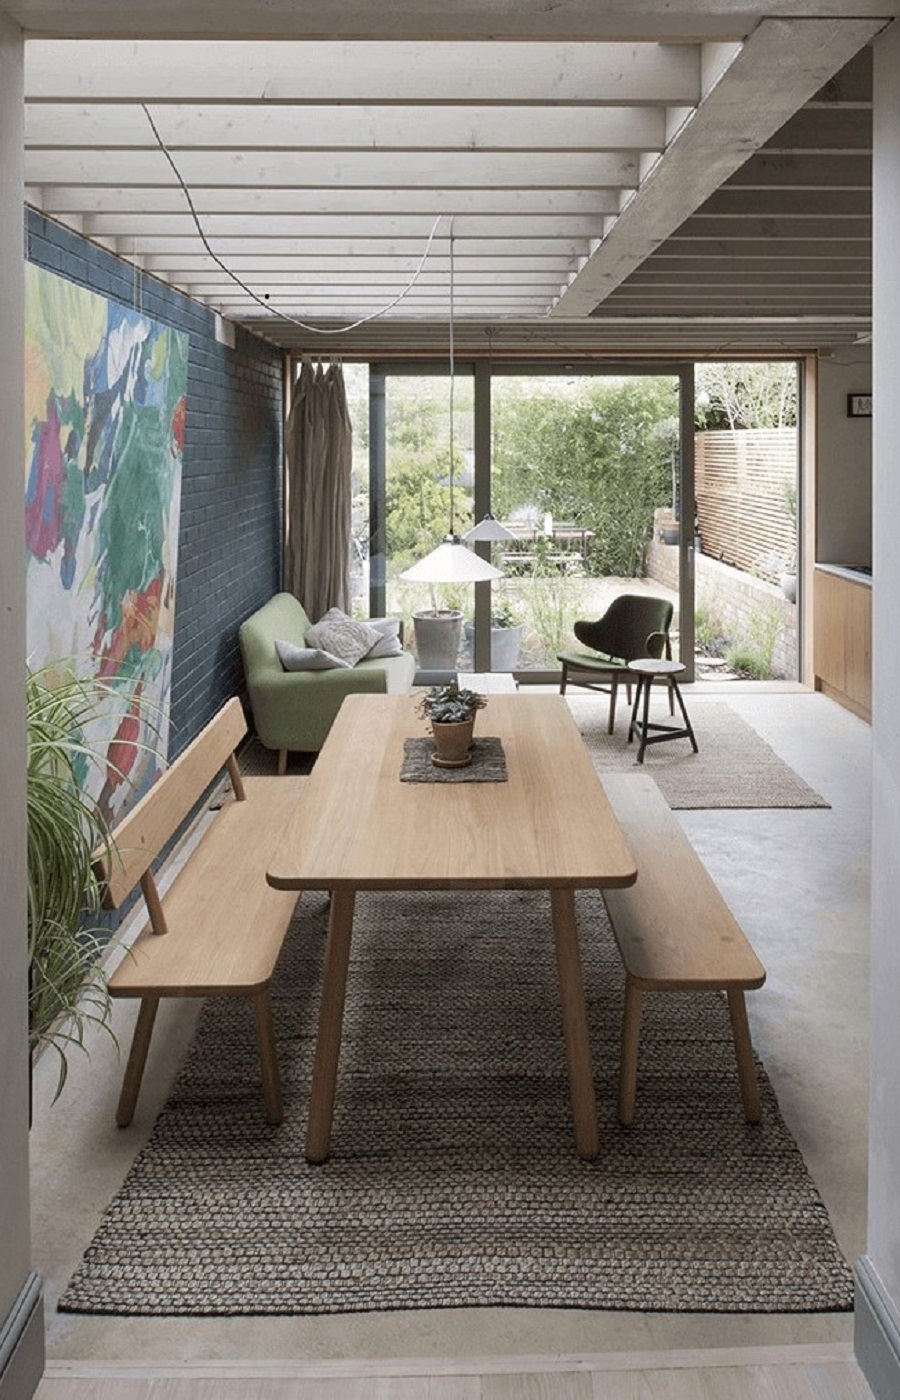
Vestry Road - Oliver Leech Architects; Photo Credit - Stale Eriksen
Side return extensions offer an exciting way of creating extra space in terraced housing without losing too much valuable garden space. However, side returns are narrow and compact with restricted access, and so the extension’s design needs to be carefully considered.
This guide covers design advice, planning permission, costs, party wall and other regulations in order for your side return to realise its full potential.
How much does a side return extension cost?
How to reduce the cost of building a side return extension
Can I build a side return extension without planning permission?
Can I build a side return extension in a conservation area?
Can I build a side return extension onto a flat or maisonette?
Do I need a party wall agreement to build a side return extension?
Side return drainage and plumbing
Side return extension layout options
Structural design considerations for side return extensions
How to introduce natural light into a side return extension
Side return extension glazing considerations
Connecting the side return extension to the outside
Victorian terraced and semi-detached housing make up a large percentage of the UK’s housing stock.
Typically two storeys high with a pitched roof on top and small garden at the rear, the main body of the house comprises a front and rear reception room at ground floor level (originally used as a parlour room and multipurpose family-kitchen-dining room respectively), a hallway and stairs running down one side, and two bedrooms above.
In most terraced houses, there is an existing extension at the back known as the ‘outrigger’ or ‘rear closet wing’, often built at a slightly lower level to the main part of the house.This contains a kitchen at ground floor (originally a scullery) and a small bathroom (retrofitted) and bedroom above.
The outrigger is half the width of the main part of the house to enable natural light to enter the rear ground floor reception room. The external space to the side - an ancillary area originally used to wash clothes – is widely referred to as the side return. It is now a prime place for building an extension.
Side return extension costs vary depending on where you are in the UK, ground conditions, drainage and groundworks, complexity of the design and level of specification.
The average costs of a simple side return extension built upon favourable ground conditions will cost from £2,800 per square metre, excluding VAT. In London, this figure will increase to around £3,500 per square metre.
These costs are just for the shell of the extension itself, and exclude items such as glazing, kitchens and bathrooms. If your side return extension is part of a wider renovation project, you will need to factor in costs for any other work.
When compared to other types of home extension, side extensions are quite expensive to build. This is primarily down to the nature of the work involved - tricky groundworks, structural installations and other trades all taking place in a restricted space.
In high-value residential areas, a side return extension will add value to a home and generate a good return on expenditure. In other areas, however, the high cost of construction is likely to offer only a small return. The main benefit of a side return is the quality of space it offers rather than financial gain.
Find about more about how much home extensions cost in the UK in our article - How much does it cost to build an extension in the UK?
To minimise build costs without losing design quality, consider the following:
Yes, but it depends on your type of property and where it’s located. If you live in a house which is not listed or on designated land, side return extensions can be built under permitted development (PD) if they meet certain design guidelines.
Under PD rights, in most parts of the UK aside return extension can project up to 4 metres from the rear wall of the main body of the house if the house is detached, or in most cases 3 metres if the house is terraced or semi-detached - normally enough to cover about half the side return.
In England, larger house extension rights exist, and you can extend up to 8 metres from the rear wall of the house if detached, or 6 metres if terraced or semi-detached when given prior approval - enough to extend most or all of the side return.
The width of the extension can be no more than half the width of the original house, although this is rarely a concern for side return extensions as the space is limited.
If your side return extension is within 2 metres of the boundary, which is often the case, the height of the roof adjacent to the boundary should not exceed 3 metres.The roof can slope up to 4 metres where it meets the side wall of the outrigger, if desired
If your design breaches these limits, you will have to apply for planning permission - see our article - How much does planning permission cost in the UK?
Please note that other statutory consents will apply when building your extension, such as building regulations and party wall approval.
Find about more about permitted development rules for house extensions - see our article - Permitted development rules for house extensions
Yes, but the design of the extension will need to meet conservation area design guidance and local planning policies.
In many conservation areas, boundary wall heights are limited to around 2 metres from ground level. While manageable, this can have an impact on how you organise the internal layout.
To get around the height restriction, you have two possible options.
Firstly, lower the floor level to gain extra ceiling height. This often requires underpinning the existing footings, which adds costs.
Secondly, if your neighbour’s side return is vacant and they have plans to extend, submit a joint application for two side return extensions. Local planning policy is often formulated to protect neighbouring amenities. If you propose a design that works across both properties, this issue is largely eliminated. It often looks better, too.
Yes, but you will need to apply for full planning permission. Permitted development rights do not apply to flats and maisonettes.
Local planning policies are often stricter than permitted development rules, and the height of your extension along the neighbouring boundary is likely to be limited to between2 metres and 2.5 metres.
It’s important to carry out a planning search of your local area before you start designing your extension. If you can find a local precedent with a taller roof approved undercurrent planning policy (older examples are less useful), it’s likely you will be able to build to the same dimensions.
In addition to council approvals, you will need to seek permission from the building’s freeholder to carry out the work.
As side return extensions are typically built close to a boundary, it’s likely you will need to form a party wall agreement with your neighbours before starting work on site.
A simple agreement can take a few days to resolve. However, if a neighbour dissents to the work, it can take a lot longer. Ideally, you should contact your neighbours at least two months before you plan to start building work.
The best party wall solution for a side return extension to a typical Victorian terraced house is to follow the existing boundary condition of the house and centre the new boundary wall on the line of junction. The benefits of this are:
Appointing an architect, structural engineer and party wall surveyor will ensure the party wall negotiations run as smoothly as possible.
For more information on the Party Wall Act, please refer to the government guidance Party Wall etc Act 1996:explanatory booklet
Victorian terraced housing did not originally contain kitchens and bathrooms. These were usually retrofitted into properties during the twentieth century.
In many cases, waste pipes for kitchen and bathroom fittings are installed on the outside of the outrigger and connect back to an external soil pipe in the corner of the side return. There is often a manhole in the side return which connects to the wider sewer network.
Rainwater pipes serving the outrigger roof and rear section of the main roof typically connect into gullies within the side return and then to the main sewer.
One of the most important tasks when designing a side return extension is to workout a drainage strategy – this isn’t glamorous, but it can have a big impact on the final built form.
Central to this is understanding the status of the existing sewer, which includes the manhole.If the sewer only serves your property, it is a ‘private sewer’ and you are free to modify it to suit the design of your extension.
A sewer shared with another property is a ‘public sewer’, and you will need the approval of your local water company to modify it, build over it or build close to it. In many cases, this can be negotiated if your proposed groundworks meet technical standards. However, if for any reason the sewer cannot be modified - say the manhole cannot be moved because of the existing ground levels - you will have to build around it.
In a typical Victorian terraced house arrangement, a side return extension is usually built to enlarge the kitchen and create a more spacious kitchen-dining space.
The existing rear reception room then becomes a middle room or through space, with reduced daylight and outlook. The best use of this space is as a TV room, children’s playroom or library – activities that don’t require lots of natural light.
The optimum ground floor layout depends on the size of the existing outrigger, the outrigger floor level relative to the main part of the house and the width of the overall plot.
Below are five layout options for consideration.
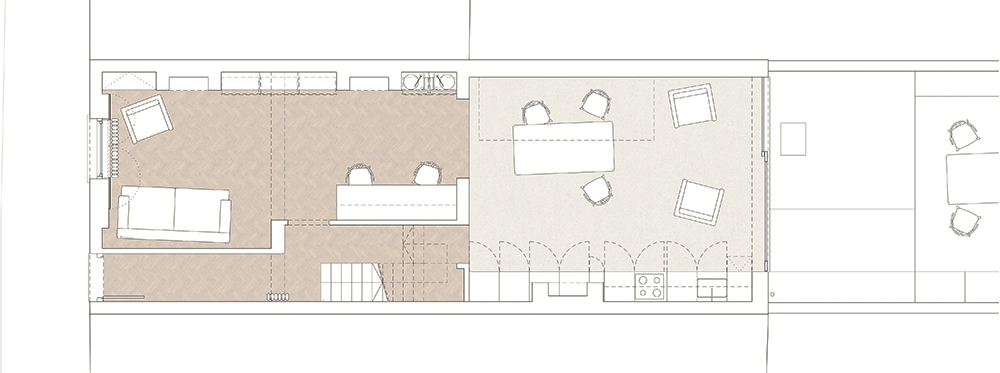
1. Ground floor layout as existing, kitchen with central island unit, dining area in the side return extension. This is most common layout. If you have a wide plot, it is possible to arrange the kitchen so there’s a run of units down the party wall, an island unit with bar seating in the centre and a dining table within the side return, or vice versa.

Inside out house - Ground floor plan - Mustard Architects
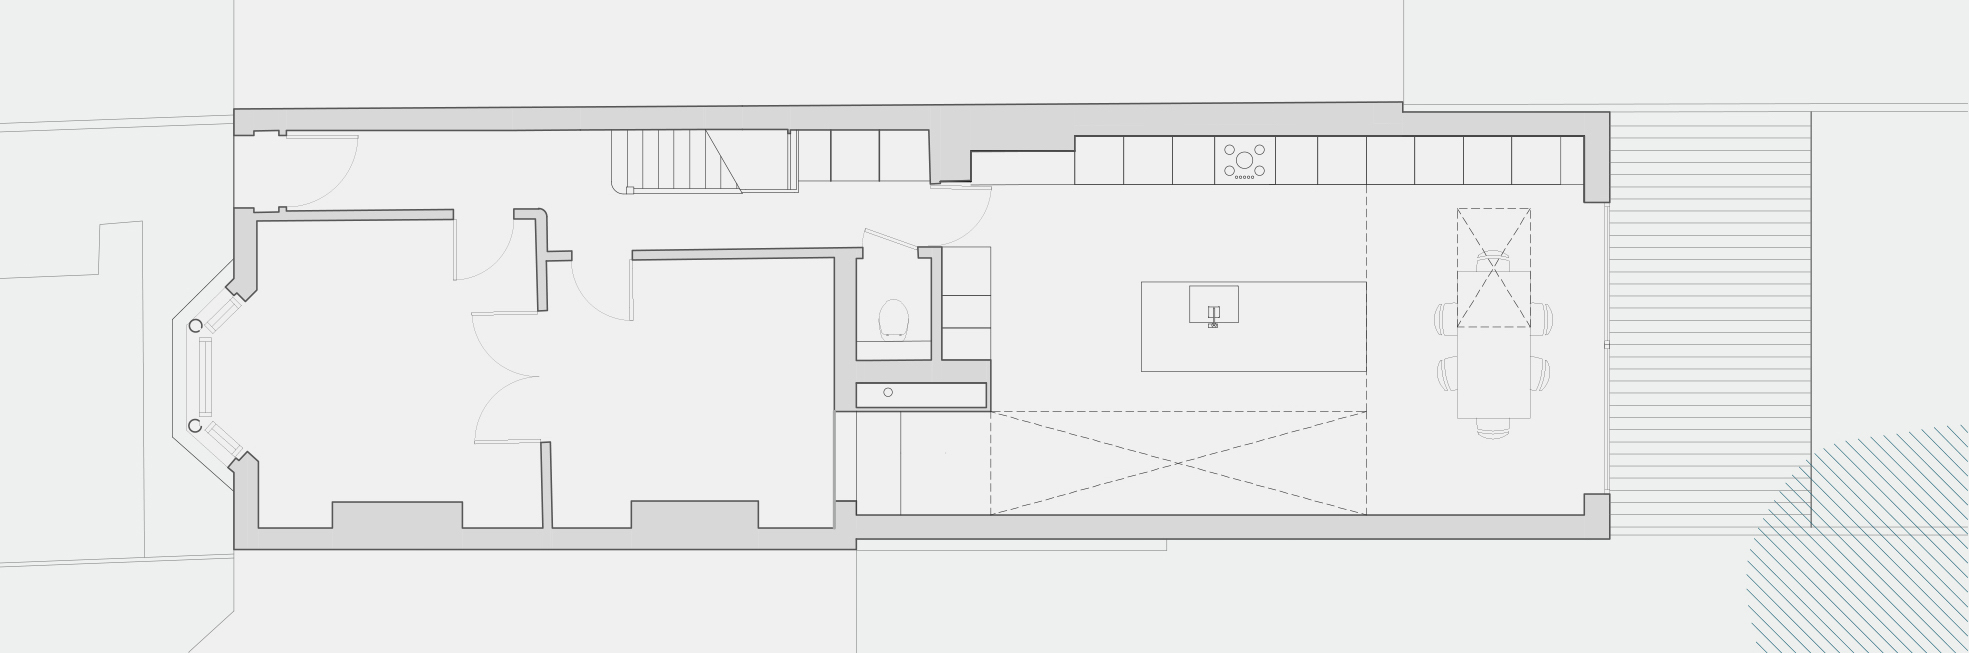
2. As above, but no island unit and a single run of kitchen units down the side wall. This allows for a more flexible use of space and is a better option if the plot width is narrow.
Durant Street - Ground floor plan - Feilden Fowles Architects
3. As above, but with the addition of a rear extension. If the outrigger is short, this will ensure the layout works successfully. If the outrigger is a decent size, the additional floor space allows inclusion of a seating area.
Brockley House - Ground floor plan - SAM Architects
4. Kitchen in rear reception room, living-dining area in the outrigger and side return extension. This is an option when the outrigger is short, as a generous kitchen-dining space is not possible. It’s not feasible if there is large-level change from the main body of the house to the outrigger. This layout requires a level floor plan from front to back.

House of Trace - Ground floor plan - Tsuruta Architects
5. Internal courtyard between the side return extension and main body of the house. This is only an option if you have a good-sized outrigger. The courtyard creates an opportunity to add and maintain good levels of natural light in the existing rear reception room.
Harefield Road East - Ground floor plan - Gruff Architects
As noted above, the structural design will have a significant bearing on costs and programme.
It’s important to consider your options carefully so the project can be delivered both on time and on budget.
The side return opening is made by propping up the first floor, removing the masonry below and inserting a large steel beam or frame within the existing outrigger side wall. For larger side return openings, a goal post (a beam and two columns) or box frame (a beam above and below and column either end) may need to be installed.
Installing the steel beam within the first-floor zone (so no downstand) will create a more aesthetically pleasing interior space, but it can disturb finishes in the rooms above. It is much easier to install the beam within the floor if the existing joists span front to back, parallel to the new beam. If they span side to side, each joist will need to be notched into the new steelwork, adding complexity, time and expense.
Utilising the corners of the existing outrigger for vertical support will simplify the structural design and make your build more cost effective. Removing the corners enables more glazing across the rear elevation and a larger internal opening between the side return and rear reception room. This does, however, require more structural engineering and higher build costs.
Exposing the new extension roof structure and running joists under the roof lights can add visual interest and simplify the structural design. It will also save on plastering costs.
If you have a restricted ceiling height, you may wish to lower the floor. InVictorian housing, this usually requires underpinning the existing loadbearing walls.
Side return extensions are tricky to build. Always use the services of an experienced structural engineer to ensure the structural elements are both well designed and practical to build.
The existing outrigger typically occupies just over half the plot width to allow light into the rear reception room. Aside return extension encloses the exterior space, reducing natural light into the existing rear reception room in the main part of the house.
Installing a rooflight to the rear, close to where the side return extension roof abuts the rear wall of the house, will minimise this problem. If your outrigger is significantly lower than the main part of the house, there may be scope to incorporate glazing in the existing wall above the extension roof.
Creating an internal courtyard will ensure good levels of natural light are maintained, albeit at the expense of internal floor area. This is only a feasible option if your side return is long enough to include it (or if you cannot move a manhole as noted in the drainage section above).
When designing the glazing elements, consider the following:
Durant Street - Feilden Fowles Architects - Photo credit - Tim Crocker
As well as increasing the ground floor area, the other main reason for building a side return extension is to connect the rear of the house to the garden.
Victorian housing was designed to be front facing with principal rooms addressing the street. The spaces at the rear are more utilitarian and do not attempt to address the rear garden.
Installing wall-to-wall glazing across the rear elevation is an obvious solution to form a connection with the garden, but it requires significant structural work and expense.
A more cost-effective solution that doesn’t compromise design quality is to retain more of the existing back wall and form separate openings in the outrigger and extension. This will allow you to articulate the different spaces within the extension (for example, a window addressing the dining area and a large door for access near the kitchen) and frame views of the garden. Integrating an internal built-in seat or external planter will further enhance the architecture.
Creating a flush threshold at door openings and matching internal and external finishes will help blur the distinction between inside and outside.
Reducing the amount of vertical framing in the glazing will enable uninterrupted views. Slim profile glazing will further maximise sight lines.
Hardstanding immediately outside the extension is often desirable. However, planting right up to the building will bring the garden into the house.
About the author: Aron Coates is an architect with over two decades of experience, encompassing projects ranging from the restoration of historic buildings to the design of contemporary homes.
The information provided in this article is intended for general guidance and educational purposes only. At Designs in Detail, we advise you appoint a skilled residential architect to provide specific expert advice for your project.


.jpg)


